Overview
The Hosted Page Custom Domain feature allows merchants to map a custom subdomain, such ascheckout.yourcompany.com, to UniBee-hosted pages.
After configuration is completed, customers can open hosted checkout or subscription-related pages using your branded domain. This helps deliver a more consistent brand experience and improves trust during customer-facing billing flows.
Benefits
Using a custom hosted page domain helps you:- present checkout and subscription pages under your own brand
- create a more seamless customer journey
- improve trust during payment and subscription actions
- support a more polished white-label billing experience
Supported Scenarios
This feature is commonly used in the following scenarios:Branded checkout flow
Use your own subdomain for hosted checkout pages instead of exposing the default UniBee page URL.Subscription management under your brand
Keep subscription-related self-service pages aligned with your company domain.White-label SaaS experience
Provide a more professional and consistent billing experience for end users.Before You Start
Before configuring a custom domain, make sure you have:- a domain or subdomain managed through your DNS provider
- permission to update DNS records
- a DNS provider that supports SSL proxying, such as Cloudflare
UniBee does not directly manage SSL certificates for custom domains. To make your custom domain accessible via HTTPS, you must use a DNS provider that supports SSL proxying.
How It Works
To enable a custom hosted page domain, you need to create a DNS CNAME record that points your custom subdomain to the UniBee target domain shown in the configuration page. The general setup flow is:- Enter your custom subdomain in UniBee.
- Copy the DNS record information provided by UniBee.
- Create the required CNAME record in your DNS provider.
- Wait for DNS propagation.
- Return to UniBee and click Verify & Save Domain.
- After successful verification, the custom domain becomes active.
Where to Configure
Go to: Settings → Custom Branding In this section, you can:- enter your custom hosted page domain
- view the required DNS record
- verify the domain after DNS setup
- check current configuration status
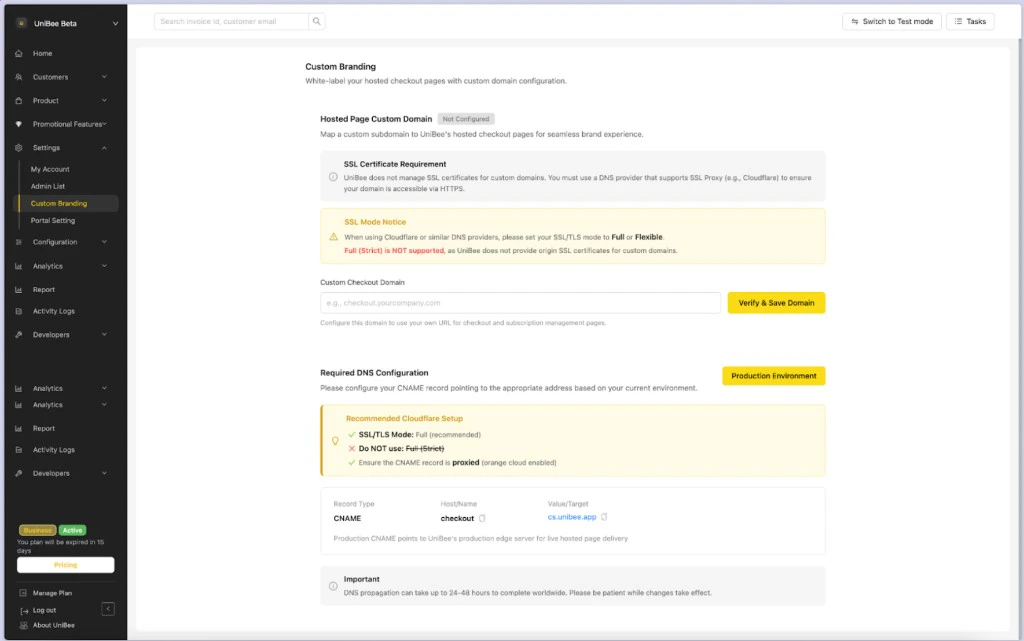
Configure a Custom Domain
Step 1: Enter your custom subdomain
In the Custom Checkout Domain field, enter the subdomain you want to use for hosted pages. Example:checkout.yourcompany.com
We recommend using a dedicated subdomain instead of a root domain.
Step 2: Review the required DNS record
UniBee will display the DNS record you need to create. Example:- Record Type:
CNAME - Host/Name:
checkout - Value/Target:
cs-sandbox.unibee.app
Step 3: Add the CNAME record in your DNS provider
Go to your DNS provider and create the record exactly as shown in UniBee. Make sure:- the record type is
CNAME - the host/name matches the configured subdomain prefix
- the target value matches the value shown in UniBee
Step 4: Configure SSL proxy mode
If you are using Cloudflare or a similar provider, configure SSL/TLS properly to ensure HTTPS access. Recommended setup:- SSL/TLS Mode:
FullorFlexible - Do not use:
Full (Strict) - make sure the CNAME record is proxied
Full (Strict) is not supported because UniBee does not provide origin SSL certificates for merchant custom domains.
Step 5: Verify and save the domain
After the DNS record has been added, return to UniBee and click Verify & Save Domain. If the verification succeeds, the domain will be saved and activated for hosted pages.DNS Configuration Reference
UniBee provides environment-specific DNS instructions. For example, in the test environment, the target may point to a sandbox domain such as:cs-sandbox.unibee.app
Make sure you are configuring DNS for the correct environment before verifying the domain.
SSL Certificate Requirement
UniBee does not manage SSL certificates for custom domains. To use HTTPS on your custom domain, you must rely on a DNS or proxy provider that can handle SSL termination for your domain. For providers such as Cloudflare:- use supported SSL/TLS modes
- enable proxying on the CNAME record
- avoid strict origin validation modes that require an origin certificate from UniBee
Verification Status
The Hosted Page Custom Domain section may show a status such as:- Not Configured: no custom domain has been set up yet
- Configured / Verified: the domain has been validated and is ready to use
Notes
DNS propagation delay
DNS updates may take up to 24–48 hours to propagate globally. During this time, verification may fail temporarily.Use a subdomain
We recommend using a dedicated subdomain such as:checkout.yourcompany.combilling.yourcompany.com
Check DNS accuracy carefully
If verification fails, confirm that:- the record type is correct
- the host/name is correct
- the target value matches exactly
- the proxy mode is enabled if required by your DNS provider
- DNS propagation has completed
Result After Successful Configuration
Once setup is complete, your UniBee-hosted pages can be accessed through your own branded domain. This means:- customers see your domain instead of the default UniBee URL
- checkout and subscription flows feel more consistent
- your billing experience looks more professional and trustworthy
FAQ
Can I use my root domain directly?
We recommend using a subdomain, such ascheckout.yourcompany.com, instead of a root domain.
Why do I need to configure DNS myself?
Because the domain belongs to your organization, DNS ownership and routing must be managed through your own DNS provider.Why is Full (Strict) not supported?
UniBee does not issue origin SSL certificates for merchant custom domains in this setup, so strict origin certificate validation is not supported.
Why does verification fail even after I created the DNS record?
Common reasons include:- DNS propagation is still in progress
- the CNAME record is incorrect
- proxy or SSL/TLS mode is configured incorrectly
- the domain was configured for the wrong environment